How to create personal nameservers
Are you ready to create your own personal nameservers? I recently covered the benefits of personal nameservers and wrote that I wouldn’t want to manage my multiple domains, and those of my clients, without them. Today I’ll summarize what you need to do to create and use personal nameservers.
First, you must have a domain name registered to you (or at least under your control), on which to create personal nameservers. For example, if you have the domain name bigdog.com, you could create personal nameservers ns1.bigdog.com and ns2.bigdog.com.
You must have a hosting plan that includes the ability to use personal nameservers, such as a reseller or VPS plan. If you don’t currently have this, ask your host about upgrading. Your host will assign you two IP addresses for use as personal nameservers: typically one for ns1., and one for ns2.
Your host should also configure your control panel, such as cPanel, to automatically use the new personal nameserver as the nameservers for any new domains you add to your account. They may also be able to change your existing accounts to use the new nameservers, so it’s worth asking. If you don’t have many domains, it’s not hard to change them yourself. Don’t make this change until after the new nameservers are properly registered and active though.
Create personal nameservers
- Check the DNS Zone of your main domain (the one on which you will create personal nameservers) for existence of “A†records for the personal nameservers. This will be in the form of ns1 14400 IN A 66.45.34.91, where that IP address is the one assigned by the host for that nameserver. While this record is not absolutely necessary, it will reduce DNS errors and speed lookups. If on cPanel, you can view and edit those records using the WHM command Edit DNS Zone.
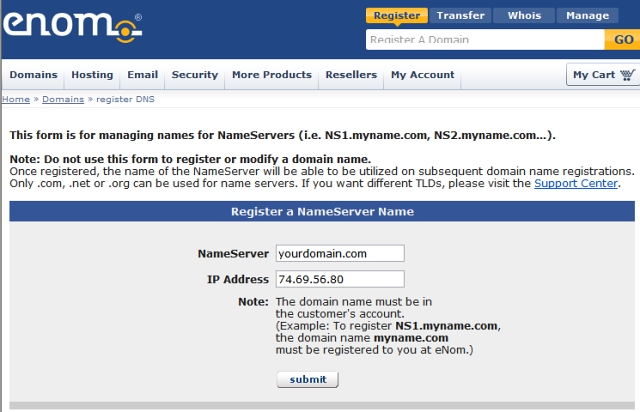
- At your domain registrar, register the nameservers. Most domain registrars have an on-line tool. (example from my registrar, eNom, is below).
- After allowing a few days for propagation, edit the DNS for your hosted domains to specify that they will use the personal nameservers. This should also include your main domain which is the parent of the personal nameservers. That’s right: a domain can use its own nameservers, so rabbit.com can use ns1. and ns2.rabbit.com for its DNS.
- Go to the domain registrar for each of the client domains to edit the nameserver list to specify the new personal nameservers. If someone else, such as a paying client, has control of the domain then ask that person to do this.
Registering personal nameservers at your domain registrar
As an example, here’s how to do it at eNom:
- Login to your account.
- Domains menu, Advanced Tools, click Register a Name Server.
- Enter “ns1.domain.comâ€, where “domain.com†is your domain name.
- Enter the IP address that your host assigned you for use as ns1.
- Click Submit.
- Repeat those steps to register ns2.
Note that eNom and many other registrars allow automated nameserver registration only onto .com, .net and .org domains. A different process may apply for other top-level domains.
Additional information
WebHostingBuzz has two relevant wiki entries:
When you resell hosting to paying clients, personal nameservers allow your domain setup to look more professional and complete. Even if you don’t resell, personal nameservers make it easier to manage and move multiple domains.


